-1.0 pounds this week!
//throws confetti//
-37.4 so far
How did your week go?
I hope it was a good one.
The church BBQ is coming up this weekend. They've been doing this for 45 years. My Uncle Bud was there from the beginning and was a major part of the planning, cooking, serving, cleaning, etc. He passed away this year, and the church is dedicating the BBQ to him. It will be the first one he's ever missed. I'm looking forward to standing in line, chatting with friends and family I haven't seen in years, and bringing home plenty of BBQ to enjoy now and freeze for later. It may be high in points, but that's what those extra weekly points are for.
Short post today.
Enjoy the rest of your week.
Make good choices.
See you next week!
Today I am showing you the final set of four cards you can create with the Tin of Cards Project Kit. Like I said yesterday, Project Kits are a great way to stock up on supplies to make cards as you need them, or to sit down and craft with friends while stocking up your supply at one time.
These cards scream elegance. I love the shiny gold cardstock used for these. In your Tin of Cards Project Kit you'll receive circle sentiments in English, French, and I think German. I decided to use one of the French circles for one of my cards. My husband and I are trying to learn French via Babbel and Rosetta Stone. Tom works for a company that has a location in Canada where everyone speaks French, road signs are in French, etc. When Tom spends a couple of weeks there several times a year, he gets immersed in French. Which is a great way to learn the language if everyone around you is French speaking.
This card has lots of elements I love. The gold foil, the clear epoxy stars, the twine....
They are gorgeous cards.
This is what the kit looks like in the 2015-2016 Stampin' Up Annual Catalog on page 110. The kit does come with envelopes as well as supplies to complete 16 cards of 4 designs. You'll need ink, acrylic block, and adhesive. You'll also need a stamp set. I recommend the Tin of Cards stamp set that coordinates perfectly with this kit. You'll also receive in your kit the beautiful teal tin to store your cards and 9 tab dividers with cardstock you can decorate them with if you choose.
copyright Stampin' Up
In addition to the Tin of Cards kit, I also used the coordinating stamp set called Tin of Cards sold separately.
That concludes all the 16 cards you can make with this kit. Be sure to scroll down to see the other sets of cards. Don't forget, this kit also comes with tab dividers you can decorate and the envelopes you can also decorate, and all can be stored in that pretty teal striped tin.
If you want a little bit of Stampin' Up fun every single month delivered directly to your door,
Here I am again today showing you another set of cards you can create with the Tin of Cards Project Kit. Project Kits are a great way to stock up on supplies to make cards as you need them, or to sit down and craft with friends while stocking up your supply at one time.
I love all the cards in this kit, and this design is no exception.
The polka dot see-through panel is striking. The photo makes it appear that two of the cards have a blue strip of paper on them, but that's just the lighting of the window behind the table where I photographed.
I stamped the top and bottom of each of the cards with a swirly border stamp included in the Tin of Cards stamp set which is sold separately from the kit. I also used that same swirl stamp to stamp the smallest butterfly's body. The delicate gold thread you see behind the yellow butterfly is included as part of this kit, and makes a beautiful, soft touch to this card. Before adhering the intricate yellow die cut to the base of that butterfly, I also stamped THANKS in Crushed Curry to the Very Vanilla background which you can see through the butterfly's wing design. These butterflies were adhered with Stampin' Dimensionals. Isn't it just lovely? I would have never thought of this design on my own. I love how these turned out.
This is what the kit looks like in the 2015-2016 Stampin' Up Annual Catalog on page 110. The kit does come with envelopes as well as supplies to complete 16 cards of 4 designs. You'll need ink, acrylic block, and adhesive. You'll also need a stamp set. I recommend the Tin of Cards stamp set that coordinates perfectly with this kit. You'll also receive in your kit the beautiful teal tin to store your cards and 9 tab dividers with cardstock you can decorate them with if you choose.
copyright Stampin' Up
In addition to the Tin of Cards kit, I also used the coordinating stamp set called Tin of Cards sold separately.
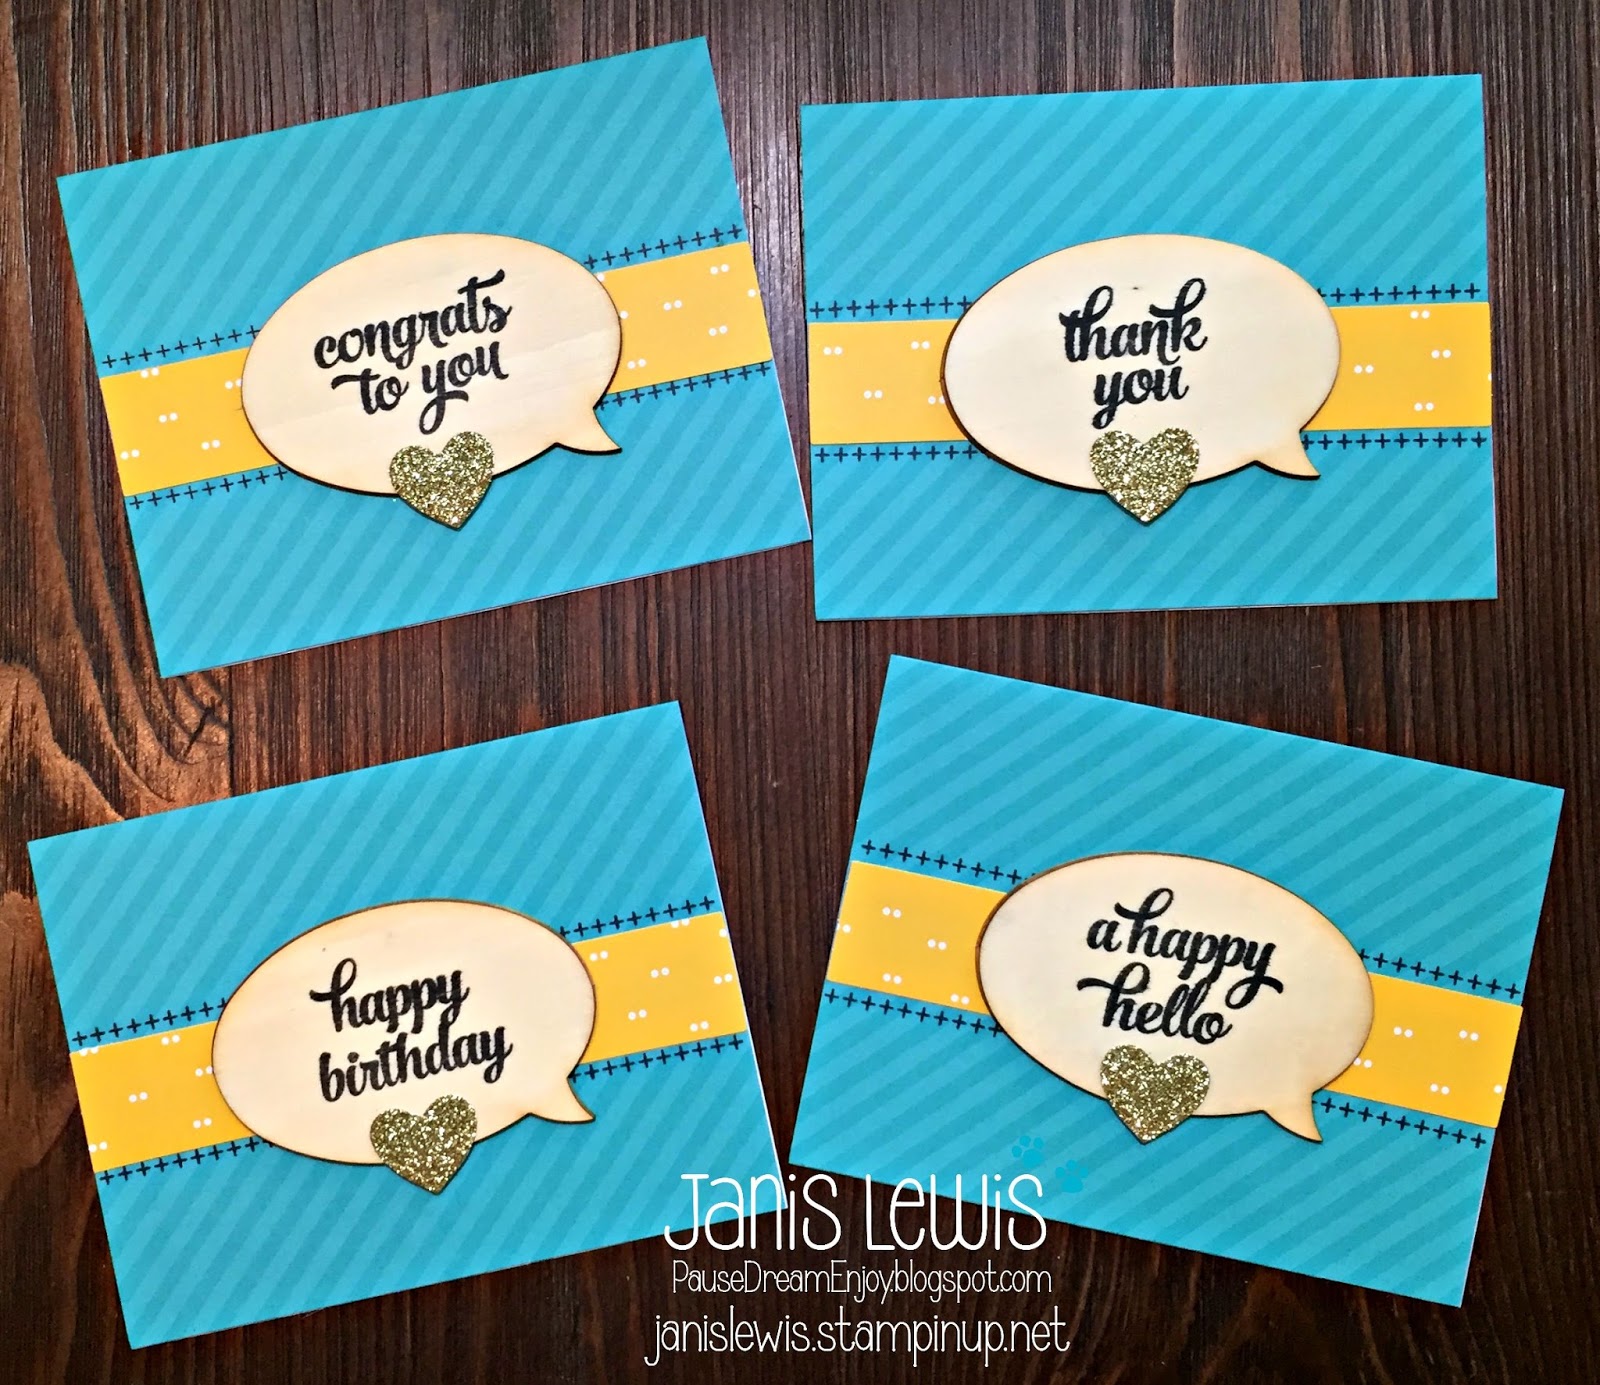
Today I want to share with you another set of 4 cards that come in the same Tin of Cards Project Kit I told you about yesterday. These cards have wood speech bubbles added to them and beautiful glitter paper gold hearts. I added the yellow strip to the background and stamped the plusses along the borders. This is where you'll need that Multipurpose Glue for a good bonding between the wood and cardstock.
This is what the kit looks like in the 2015-2016 Stampin' Up Annual Catalog on page 110. The kit does come with envelopes as well as supplies to complete 16 cards of 4 designs. You'll need ink, acrylic block, and adhesive. You'll also need a stamp set. I recommend the Tin of Cards stamp set that coordinates perfectly with this kit. You'll also receive in your kit the beautiful teal tin to store your cards and 9 tab dividers with cardstock you can decorate them with if you choose.
copyright Stampin' Up
In addition to the Tin of Cards kit, I also used the coordinating stamp set called Tin of Cards sold separately.
I think I'm going to do some crafting, some reading, and definitely some Project Life Scrapbooking. I downloaded the app around Christmas or so when it was like 99 cents or something cheap.
I haven't been using it too much, but I think I'm going to test out creating a page and having them print it for me. Not sure if that's going to be enough hands on for me or not, but you never know until you try.
Today I want to share with you one of the four sets of cards that come in the Tin of Cards kit. I do love kits. They make card making super simple and oh so satisfying. This card is what grabbed me first when I saw this kit. I love the whimsy background and gold epoxy hearts. Plus that diecut heart swirl is pretty fun. All of the card designs in this kit have a uniqueness about them. All different, and all giving amazing results.
Two of these cards I stamped with HAPPY, and two with THANKS.
This is what the kit looks like in the 2015-2016 Stampin' Up Annual Catalog on page 110. I didn't mention it before, but the kit does come with envelopes as well as supplies to complete 16 cards of 4 designs. You'll need ink, acrylic block, and adhesive. You'll also need a stamp set. I recommend the Tin of Cards stamp set that coordinates perfectly with this kit. You'll also receive in your kit the beautiful teal tin to store your cards and 9 tab dividers with cardstock you can decorate them with if you choose.
copyright Stampin' Up
In addition to the Tin of Cards kit, I also used the coordinating stamp set called Tin of Cards sold separately.
I'll be back tomorrow with another set from this same kit.
All of the cards are pretty fabulous.
If you want a little bit of Stampin' Up fun every single month delivered directly to your door,
Have you guys tried the Stampin' Up monthly kit called Paper Pumpkin?
If you want a little bit of Stampin' Up fun every single month delivered directly to your door,
The kit included:
Wickedly Sweet Photopolymer Stamp Set
Cajun Craze Classic Stampin' Spot ink
8 kraft bags
8 kraft fringe wrap pieces (self-adhesive)
8 paper straws
2 sheets of striped tags
2 sheets of white tags
8 white support pieces
8 pieces of orange thick baker's twine (18" each)
8 pieces of raffai (18" each)
I started out duplicating the samples shown on the instruction sheet, but was having so much fun, that I quickly added a second ink color to the mix (Rich Razzleberry), and did more stamping on the tags. My favorite 2 stamps in this set are the dotted line and the straight line. I found I kept wanting to stamp those on everything with different combinations.
Oh so much fun! I filled my treat bags with Hershey Chocolate Nuggets then tied lots of knots in the raffia. LOL Maybe that will stop me from opening them and having a chocolatefest. Submitted: 2 Creative Chicks - anything goes Don't forget, today is the last day to link up any 3D project over at my challenge blog, PDE Linky Party. You can link up as often as you like. Themes are open to your interpretation, and it can be any type of crafting using any brand of products. A new theme starts tomorrow and every Friday. I'll give you a hint..... every last Friday of the month has an Anything Goes theme. :) Hey! Click this link....
This week's Weight Watchers Wednesday post is probably going to be a little longer than normal. (Okay, a lot.) If you don't have time or are not interested in reading all my thoughts and chatter, skim through and read the posters at least. There's a message in there for you. Pick one. Repeat it to yourself every day, and I'll see you back next Wednesday. If you are in for the long haul.... read on, my friend. :)
In January, I got sick and tired of how my physical body was
looking
acting
and slowing me down.
Not to mention what my physical image did to my mental state.
I decided I'd lived that way long enough.
Every year another few pounds.
Always more. Never less.
Enough is enough.
If I kept doing what I was doing,
how was anything different suppose to happen?
I needed help.
I needed flexibility.
I needed to make a change on my terms, in my timing, and feel the rewards of success.
Weight Watchers was the only option for me.
Why?
Because Weight Watchers is focused on food -
not starving,
not brutal exercise routines,
not pills,
not fasting.
I know it works because I had done it twice in the past.
But in the past after a little success,
I'd go back to my old habits.
Yeah, well, I'm human. Mistakes are bound to happen.
So the last week of January, I signed up with Weight Watchers.
I didn't wait for a certain day of the week.
I didn't talk to my husband about it first.
I didn't get approval from friends or other family.
I just did it.
If I wanted a change (and I did very much),
I had to make the decision to change.
No one could do it for me.
Things were going to have to change,
or let's face it,
nothing would ever change.
I'm not "all that."
I don't exercise.
I don't eat salad.
I'm not strong when it comes to temptation.
Chocolate and I go way back.
But I am determined.
And determination goes a long way in making a change.
Especially a hard one.
Some days are easier than others.
Definitely a mental battle for me.
Lately I've been hovering around a certain weight.
Gain a little. Lose a little.
But not big victories on the scale.
I let myself stay there for quite a while.
Eating whatever I wanted, but still tracking the points.
At some point, a little more effort is called for.
I'm at that point.
But before I get into that, let me take a sidestep and tell you about my husband.
My husband and I are both trying to lose weight.
He does a lot of physical exercise.
He's a runner, a biker, a hiker, a walker.
He runs almost every morning.
I'm not talking like running around the block.
I'm talking running 3 miles this day, 5 miles that day.
He's out there at oh-dark-thirty getting his run on.
Good for him, but it's never going to be me.
I hate exercise. Just being honest. It's not my thing.
I'm so very thankful to have a husband though that supports me completely.
Just because he's a runner, he doesn't condemn me because I'm not.
He compliments me on my physical body (even though I'm still way overweight);
He will change restaurant plans to go somewhere that's Weight Watcher friendly just for me and my point counting.
So, back to where I was heading before that little side-step...
As I said earlier,
At some point, a little more effort is called for.
I'm at that point.
I started thinking about what I did when I first started Weight Watchers earlier this year, and thinking about what I've been doing lately with my weight not really moving downward too much.
When I first started I was eating diet food and fresh fruits & veggies all the time.
Lately I've been eating whatever, but still counting points.
That's not working for me.
So when I went grocery shopping this week
(normally, Tom & I go together, but this week I went by myself)
I came home with this announcement,
"I hope you are in the mood for a diet change this week."
His answer,
"I have no problem with that as long as it's a healthy change."
Good answer. Because diet food and fresh fruits and veggies cost more than processed foods, drive-thru foods, etc. So it's good to know spending more at the grocery store to eat and live healthier is not an issue with my hubby. (These are part of the little thank you's I include in my prayers. My husband is quite fabulous.)
Tom had suggested at our Ikea visit on Sunday when I noticed it was the 2nd time we had eaten out and he was eating meatless, that I try some of the veggie burgers, veggie meatballs, etc.
Good advice. At the grocery store, I stocked up on veggie everything.
Burgers, meatballs, chicken, sausage and other goodies I found.
I bought more fish. We love fish, but it does cost more than hamburger meat, so I tend to buy more beef than fish. Not this trip.
As I was looking back at what worked so well for me at the beginning of the year, and what I had slacked into recently, it's obvious that I need more fresh foods and less junk.
Just because a Hershey Chocolate Nugget is very few points if you eat one, doesn't mean it's good nourishment for my body or that I'll stop eating them after only one.
Mistakes have been made these last 9 months, but like I told Tom last night, I am still so very proud of myself for not quitting. Not giving up. Not saying or thinking it's too hard. Not telling myself that 36+ pounds loss is good enough. It's not good enough. I am very happy with how far I've come, but I'm not done yet.
If you are where I am,
don't give up.
If you are tired of where you are in life,
make a change.
If you think that you've screwed up so much, you might as well quit,
remind yourself how important you are.
You are fabulous.
You are amazing.
If I can stick with it for this long, anybody can.
I'm a choc-aholic.
I have to eat every couple of hours or so or my blood sugar drops and I'm shaking, dizzy, and headache starting.
I'm just like you.
I made a decision.
I have made mistakes.
I have not given up.
Don't give up.
I still haven't gotten a recent weight loss photo taken.
So I went outside and took one.
No makeup, but hey, it's the real me.
AND... I'm not even sucking my gut in.
Weekly Weigh-in stats: -0.6 lbs this week -36.4 so far 57 more pounds to go. Sounds impossible, but I know it's not. I mean, 36 pounds gone sounded impossible when I started, and here I am! Starting Weight: 203.4 Current Weight: 167.0 Goal Weight: 110.0 Join Weight WatchersHERE
Mini Apple Pies 3 PointsPlus value each
I gotta try this one!
For those of you reading this who are a card maker, scrapbooker, etc.....
If you want a little bit of Stampin' Up fun every single month delivered directly to your door,
Hi, everyone!
I saw a very pretty card on Pinterest and decided to give it a try for myself.
I changed the embossing and colors, but the sketch is the same.
Here are the products I used
(except the Stampin' Dimensionals - I forgot to throw those in the photo).
The tiny dots embossing folder I used is a retired one from SU.
My Acryllic block is size D. I seem to use that one for most everything.
LOVE the Stampin' Mist & Scrub Pad. It's so much better than using Baby Wipes like I've done for years. And the mist smells good too. :)
If you've never shopped Stampin' Up with me,
I would love to have you as a customer.
If you are considering joining Stampin' Up, why not join my team!
I say team, but right now I'm a team of one. LOL
I'd love to have you be a part of Stampin' Up with me.
It's so fun.
Plus we get to use our own discount not only on our product orders,
but also on our Paper Pumpkin subscription. :)
Let's talk about it. Email me 66cricket at gmail dot com.
What have you been up to lately?
Doing any stamping, organizing, family trips, decorating?
Saturday, my husband & I went and bought new vehicles.
It's something we've been talking about and planning for quite a while.
We've been to several dealerships and considered several different makes & models, but finally made a decision. We are both very happy with what we brought home. I love my new car so much, that I've named it Kiki. I'm silly like that. Mine is the red one. Tom's is the cream colored one.
Sunday we went to Ikea. Tom got a new desk that raises for standing and lowers for sitting. He thinks this would be a good desk choice for me when he remodels my craft room. So that's what I'll probably get. I like stamping on my glass top desk, but I hate seeing through my desk to the wires below, and the glass is always sliding around. We also picked up a Raskog rolling cart for my craft room. That should be fun!
Okay, well, I'm off to do other things (like run errands, wash clothes, all that jazz).
You guys have a crafty day.
See you tomorrow!
If you want a little bit of Stampin' Up fun every single month delivered directly to your door,
If you want a little bit of Stampin' Up fun every single month delivered directly to your door, sign up for Paper Pumpkin right away! Be sure to email me letting me know you used my link. I'll add you to our Facebook Group where we share our Paper Pumpkin creations each month AND share alternate ways to use your kits!
All subscribers for the October Paper Pumpkin Kit will receive their kit in a PINK box (but the project inside isn't pink). Stampin' Up with donate $1 for every active subscriber and $2 for every new subscriber in October to the Breast Cancer Research Foundation. Be sure to share this link with your friends to help us STAMP out Breast Cancer!
Hi, crafters!!
How many of you use planners?
Add stickers?
Colorful writing?
Stamp in them?
I've seen planners out there that crafters are sharing posts about. How cute they look with stickers and colored pens. How neat and tidy they are, and how organized. I recently re-visited an August post on my friend, Karla's, blog. Here's the link.
That's it. She's done done it now. LOL I have the planner fever.
So today I went to Michael's.
They are out of stock.
Bummer.
Drove to Hobby Lobby.
Jackpot!
Planners, refill pages, pocket packs, sticker packs, cover assortment packs.
I'm in trouble.
Poor Bonnie had to stand there while I stared at the Planner wall trying to decide what to get and what not to get. I ended up buying the planner, a pack of pocket pages, and one pack of stickers.
Of course I used my 40% off coupon as well.
I plan on using my Stampin' Up! Stampin' Write Markers and all of my fun SU stamps in my planner. I have the BRIGHTS collection right now, but I'm sure I'll end up with all the markers. They are fun to use on stamps too just coloring the parts I want green, green, and the parts I want pink, pink.
This is going to be so fun!!
If you guys are into planners, I'd love to see some of your pages.
The last Friday of every month is always an Anything Goes link up over at PDE Linky Party. Link up some of your planner pages!
If you want a little bit of Stampin' Up fun every single month delivered directly to your door, sign up for Paper Pumpkin right away! Be sure to email me letting me know you used my link. I'll add you to our Facebook Group where we share our Paper Pumpkin creations each month AND share alternate ways to use your kits!
All subscribers for the October Paper Pumpkin Kit will receive their kit in a PINK box (but the project inside isn't pink). Stampin' Up with donate $1 for every active subscriber and $2 for every new subscriber in October to the Breast Cancer Research Foundation. Be sure to share this link with your friends to help us STAMP out Breast Cancer!
Happy Friday!
Today starts a brand new theme for PDE Linky Party, & it's all about 3D projects.
Did you know you can get great project ideas from the PROJECT IDEA section in the Stampin' Up store?! There are lots of ideas there, but if you need even MORE ideas, check out my webstore section called GREAT IDEAS!
I made these super simple cards,
the custom envelopes using the Envelope Punch Board,
AND
a little storage box for them.
The storage box idea came from another crafter who said she doesn't even know who designed this originally. Here are the instructions so you can make one too. Super easy!
Card Box Holder
Outside
6 x 10 1/4 cardstock
Score 4 1/2 and 5 5/8
Front layering
4 1/4 x 5 3/4 cardstock
4 x 5 1/2 designer series paper
Inside pocket
4 x 11 cardstock
Score 2 1/4, 3 1/4, 7 3/4, and 8 3/4
Turn and score 1"
Pocket layering
4 1/4 x 2 3/4 cardstock
4 x 2 1/2 designer series paper
Belly Band
2 1/2 x 12 cardstock
2 1/4 x 12 designer series paper
Building your Card Box Holder
Outside
Use a bone folder to crease scores for spine.
Go ahead and layer the cardstock and designer series paper, then adhere to outside of box.
Inside Pocket
Use a bone folder to crease all score lines. Cut score lines 1 inch up to crossing score lines.
Layer front pocket pieces and adhere.
Flip over.
Fold up these pieces and apply tear and tape EXCEPT to the large middle piece. This will be the bottom of your pocket and will not adhere to anything.
Fold up both sides to create side spines.
Fold both sides in toward back of pocket to create a box.
Adhere pocket box to inside bottom of the holder.
Belly Band
Layer designer series paper onto cardstock.
Gently fold around box with overlapping part in back.
Create soft creases where band folds around holder, remove, and score soft crease lines with bone folder.
Add ribbon and punched acorn to front for decorations. I frayed the ends of my ribbon just for a different look. You can also adhere part of the ribbon to the back of the belly band for more stability, but this is optional.
Finish:
Stuff your handmade cards and envelopes (envelopes are too easy with the Stampin' Up Envelope Punch Board!) into your Card Holder. Depending on the thickness and layering of your cards, you may be able to get anywhere from 4 cards and envelopes to 12.
This is a great organizational / storage idea for your craft room, but also a great gift!
Ideas for Pocket Card Holders:
Birthday
Christmas
Halloween
Thanksgiving
Valentine's Day
Easter
July 4th
Summer
Vacation
Graduation
Wedding
All Occasion
Anniversary
Congratulations
Thank You
New Baby
Get Well
Hostess Gifts
College Student gifts (to mail cards home)
Retirement
Thinking of You
Miss You
...... and on and on and on
I think this would be an excellent idea to give my Downline when they sign up with me. Not only is it a usable, great gift, but it also will give them ideas as they just are getting started in their new business.
If you want a little bit of Stampin' Up fun every single month delivered directly to your door, sign up for Paper Pumpkin right away! Be sure to email me letting me know you used my link. I'll add you to our Facebook Group where we share our Paper Pumpkin creations each month AND share alternate ways to use your kits!
All subscribers for the October Paper Pumpkin Kit will receive their kit in a PINK box (but the project inside isn't pink). Stampin' Up with donate $1 for every active subscriber and $2 for every new subscriber in October to the Breast Cancer Research Foundation. Be sure to share this link with your friends to help us STAMP out Breast Cancer!